Raspberry Pi Zero is $5

piZero

Dubbed the “Zero” this new version of the Raspberry Pi has been advertised for as little as $5.

We couldn’t find any shops actually selling it at this price but don’t let that detract from the product.

The Zero is about half the size of the Model A+ but with twice the power –

  • 1GHZ CPU (Single core)
  • 512MB RAM
  • MiniHDMI
  • Composite video
  • USB On-The-Go
  • Same Micro USB power

The new Zero joins the current Raspberry pi lineup to make a total of 6 different types of Raspberry Pi available from the foundation.

Which pi you choose is up to your application –

Ethernet over power

Turn your household electricity points into Ethernet adapters

ethernet_0The introduction of Gigabit Ethernet over power adapters from major vendors such as Netgear, Belkin and Netcomm has seen a drop in price of the previous two generations (200MB/sec and 85MB/sec) of adapters, making the hit and miss nature of Ethernet over power a much more attractive idea.

This quick guide will cover the various issues of putting together a reliable powerline link, whilst trying to cover some of the more common  questions about this technology.

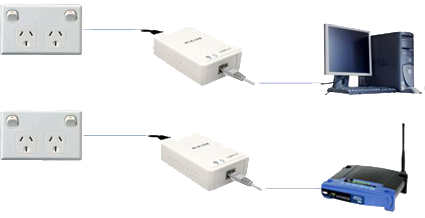
The premise of this Broadband over powerline technology is that you plug one end of your network cable into your broadband router and the other end into your wall socket through the  adapter. At any other wall socket in your house you then connect an identical adapter, run an Ethernet cable from that adapter to your PC.

The adapters piggyback your Ethernet signal over the electrical wiring in your house allowing you to route your internet connection to anywhere you have a household electrical wall socket.

The flexibility for providing an internet connection in any room without traipsing wire throughout your house is quite an attractive prospect.

You can even use these adapters for connecting a shed or a granny flat to the main house.

One nice feature of these devices is to create a bridge between two WiFi access points. this can give you fancy roaming features on two cheap home WiFi routers.

Why Not Wireless?

Many people suggest using Wireless in these situations because of concerns that Ethernet power line devices may be insecure, dangerous to other network equipment and even fire hazards and while it is true that the Belkin adapters get warm and that they broadcast your network across an entire household they have not yet sent a burst of 220 volt power to my switch.

Whilst not every network will benefit from Ethernet over power (EOP), there are a few situations where ethernet over powerlines would be superior to WiFI such as

  • Wireless signals may not reach the distance
  • Wireless spectrum may be saturated (too many APs)
  • Wireless signals are more exposed to drive-by detection and attack.

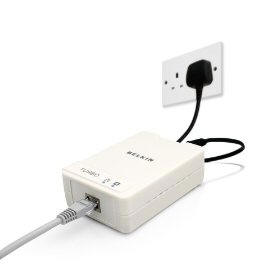
Belkin Powerline 85Mpbs

Whilst we review only the Belkin Power line Starter Kit (F5D4071) the tips and tricks in this article apply equally to all other Ethernet over power adapters available.

The Belkin Powerline 85Mbps model is sold in a starter kit (2 units) or individually. The rather simple chassis design sports two sockets, one for the wall socket power cable and the other for a 10/100 Ethernet cable. The chassis has two ultra-bright blue LEDs, one for Ethernet activity and the other for power line activity.

The design of the unit is a little odd, as having the plugs at opposing ends makes stacking the unit on your routers messy. The newer units tend to plug straight into the wall but to be honest i think a classic SOHO switch design where it all plugs in from the back would make it play nicer with the other toys on your desk

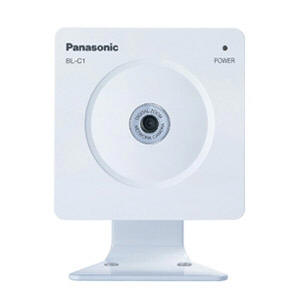
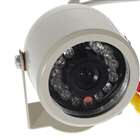
Our test setup was to install a remote IP camera at the end of the Belkin powerline network. A VM was set up to poll the camera and record the signal. We thought this type of test would place continuous load on the adapters and reflect a real world situation.

Speed

Overall the devices are certainly not as fast or reliable as a cable. not even close. Our tests showed they weren’t even as reliable as wireless. The ping tests in our setup showed reasonable ping rates (3~7ms) , but about 1 in 20 pings took 300ms, which is unforgivable for broadband. They seemed quite able when carrying light loads (such as web browsing) but became unresponsive when under constant load (file/image transfer).

The 100Mbps camera used was tested capable of transfering 2 frames a second on a normal cat5 cable. At it’s peak the powerline link seemed to be transferring 600Kbps, but the choppy ping rate was manifested as occasional serious lag in the display of images, some lasting up to a few minutes before the signal became strong and the images began to flow again. After setting the frame rate back to 0.25 frames a second the camera seemed to be more stable.

An average rule of thumb with power line devises is to divide the advertised speed by 10. The advertised speeds are top speeds from lab tests and don’t really reflect real world conditions. As you can see above, Expecting even a constant 8.5Mbps from an 85Mbps device is probably too much.

Security

The Belkin devices (and the rest of the 85Mbps brands as far as I know) all use 56bit DES encryption and everyone knows that this old standard is no longer considered even vaguely secure. It’s enough to keep your neighbors from jacking in to your Ethernet from any power plug in your tool-shed, but it won’t even stand up in a fight against an organised hacker.

The adapters are layer 2 Ethernet, meaning they don’t have an IP address or configuration console. The adapters came with some software that you can run on a windows PC to find the devices on your Ethernet network and configure the 56bit DES encryption password but nothing else.

Whilst it’s by no means necessary, our test system placed a Cisco 2610 router between the inside Belkin adapter and the soft part of the network and we’d recommending commandeering that old ADSL 1 router you have lying around into the job if you know how. This way, even if someone does jack into your network, they will be on the wrong side of a NAT’d hardware firewall.

Range

powerline_1

In Australia many larger houses are wired with several circuits, whilst most townhouses and apartments will have only one. Contrary to what most people think Ethernet power line devices will happily connect across different circuits however the manufacturers claim that the signal will not pass through the billing meter.

As long as your shed or granny flat doesn’t have a separate electricity billing meter and receive separate bills from the electricity company you should be able to receive a signal.

This also means that the signal from these devices will be isolated from the rest of the street. There is however,quite a bit debate about the exact nature of this in forums.

Belkin says the 85Mbps units have approx 20 metres range. This means 20 metres of internal house wiring, not 20 metres as the crow flies. Be warned you might not get a signal on a wall plug this far away from the other plug and you will receive performance drops the further the devices are apart.

If you’re out of range you can shift one of the adapters to a closer wall socket and simply run a longer cat5 cable to the adapter. This may help greatly is situations where the signal is poor or choppy.

Testing the range is easy as the power line activity light illuminates to show you if the adapter “sees” any other adapters on plugged into the house wiring. You don’t need a PC or router plugged into the adapter to check the connection. Simply plug the two devices into power points and see if the blue light comes on. If it does then you can most likely use those power points. If it doesn’t then you can take them straight back to the shop for a refund 🙂

Compatibility

HomePlug 1.0 and AV are the twoHomePlug Powerline Alliance standards. You will know if your adapter is compatible as the standard dictates there will be a HomePlug certification mark

Power boards

You can use the devices with normal power boards and double adapters but not with expensive power filtering or surge protection boards. Normal power bards that are overload protected will work fine. The expensive filtering and surge protectors tend to filter out the Ethernet signal. Belkin say that their unit has it’s own surge protector so you don’t need it connected to one. You will still need to find plug that is available. Either a nearby wall plug or a power board that doesn’t have surge protection. Make sure you don’t coil the power board cable, it seems to reduce the signal reliability. You will get the best results by using a wall plug on it’s own without any other devices sharing the plug, but your actual mileage may vary

Extension cords

When the Belkin units were tested there was no noticeable difference between using them on a 10 metre power extension lead before plugging them into the wall, but users on forums have complained of this with other brands. Make sure you don’t coil the extension cable, it seems to reduce the signal reliability.

Chassis heat

The Belkin adapters did not generate a significant amount of heat. Whilst they did appear to be warm after days of use they were certainly not hot and would not require much ventilation if you wanted to place the unit in a cupboard or under a bed.

Many forum posters have indicated other brands generate significant heat that requires proper mounting/ventilation.

Uninterruptible Power Supply (UPS)

You cant really use these devices with an Uninterruptible Power Supply (UPS). Many UPS’ will filter the signal altogether, others may allow a signal but only downstream from the UPS.

Multiple adapters and shared bandwidth

Most of these devices share their bandwidth. The more adapters you plug in to your wiring the more the individual adapter’s bandwidth will decrease as it is shared amongst all the adapters on the network. Even if they are on a different workgroup/subnet/DES password.

In Summary i’d suggest only using Ethernet over power when you have to, or when there is an huge gain above conventional methods. The spotty speeds combined with the adapter’s requirement for non filtered power make them second best against other cheaper WiFi and cable solutions.

Servers made for SOHO

While many applications can be virtualised along with the servers they run on there will come an application, service or business requirement that requires a new server be present in your network architecture. Not only does this require purchase of server hardware but also a hardware support contract and probably a data backup contract as well.

The most popular choices for server hardware and support contracts are the big names such as IBM, DELL and HP. These manufacturers use quality (read expensive) certified equipment in their servers that guarantees compatibility with software (see ESX) as well as reliability.

Many organisations choose their hardware and hardware support contract from the same supplier. these support contracts typically consist of a warrantee on the equipment with a set turn-around time for repairs should it fail.

Most IT departments will also need a data backup plan in place that takes backups of the organisations data off-site for safe recovery in the event of a disaster.

Server Hardware ............................. $4000
+ Usual hardware support contract (p/a) ..... $1333
+ Usual remote data backup contract (p/a) ... $5000
Total: ..................................... $10333

Unfortunately the cost of the hardware support contract and data backup contracts are often far in excess of the hardware they run on. If you’re somehow able to forgo this support or are able to provide it yourself then you could save yourself a packet by implementing a white box server solution

The White box solution

This is a custom server put together from individual parts. White box server solutions often incorporate SOHO or home-user parts to impersonate high-speed expensive servers and as a result are usually much more powerful but lack the reliability of their name brand brothers. Because white box servers are sourced as parts they are much, much cheaper than their branded counterparts.

The bottom line is bang for your buck – but only in the right situation!

Operating System

Your server operating system may be pre-chosen by your organisation but how you run it may be up to you.

If you’re not running VMWare ESX Server, but are wanting to run virtual servers (via VMWare server, Microsoft HYPER-V or Linux KVM/XEN virtualisation) then a white box server will give you memory by the bucket load.

There’s plenty of choice when it comes to choosing a server OS…

Windows 2008 Server standard (5 user) ..... $900
Redhat Enterprise ......................... $349
any linux ................................. $FREE

…but a true white box server should use an open source operating system
Motherboard

Choosing the motherboard is the most dangerous part of setting up your server. To get the most out of any motherboard you will need chipset drivers. You will need to make sure you have chipset drivers available for the server operating system you choose.

VMWare ESXi server has only a limited range of supported hardware. If you’re planning on building a white box server to run ESXi server, be very careful about which hardware you purchase. You may find you will end up spending quite a bit sourcing the right supported hardware, so remember there are many other virtualisation options that will work on white box setup such as Microsoft HYPER-V solutions and Linux KVM/XEN virutalisation solutions.

Supported Hardware

If you’re planning on running any SOHO hardware in the server, driver support is important. Security camera software is a good example of a situation where you may have a capture card in your server. The capture card may not be supported by your server OS. While there are options for PCI passthrough from the host to the guest operating systems, it is only supported by specific PCI cards and motherboards.

Believe it or not there are at least 10 different types of PCI slots/sockets used in computer equipment. Whilst most of the PCI card interfaces are compatible you’ll need to check the voltage on older PCI cards. You may have to purchase a brand new capture card because the cheap 5 volt PCI card you’ll have lying around probably* won’t work in a 3 volt PCI slots (* some cards support both voltages).

If you’re wanting to access the capture card from a VM, forget it, No virtualisation software seems to support capture cards. From the looks of things it may be some time until they do. You will need to look at our article on Zoneminder and TCP/IP based cameras for more information.

If you have specialist USB hardware that doesn’t have drivers for your server OS (such as no 64bit support) you’re also on your own. By the way, you can’t try and install the 32bit driver in a 32bit VM either because USB sharing only works when the device is supported by the host OS.

soho_server_HDD_rackDisk Drives

If you’re organisation requires strict recoverability and failover then you will most likely be installing expensive Fibre Channel (FC). However if you’re able to fill your server with cheap SATA2 Hard drives you’ll find you can quadruple your amount of disk storage and still save money on the disk.

If you do need recoverability don’t rule out the fact that you can still build a RAID setup of SATA2 drives for less than the cost of a good FC controller.

Fiber Chanel (FC) HDD ..................... $100/50GB
SATA2 HDD ................................. $100/1000GB

If you’re assembling your own white box server you will definitely want some 5 1/4 SATA2 drive racks for your server. These racks give you all the benefits of modern hot swappable SCSI drives for $20.

Because they don’t use caddies there’s no expensive drive holders. You can swap in any SATA drives for backups or failover at any time.
If there’s one thing we recommend for your server this is it.

Memory

Everyone knows a true server must use ECC memory, but if you don’t mind rebooting your server once in a while then using non-ECC memory will drop the cost of memory down to 1/5th of the price. Motherboards typically only support either type, so you’ll need to make up your mind about memory when you purchase your motherboard.

ECC DDR2 .................................. $100
NON-ECC DDR2 .............................. $20

At 1/5th the price you could even choose to double or triple the memory present in your new white box server and still save money.

soho_server_pci_riserCase

You’ll need a case with good cooling. If you have access to a server rack, then use a rack case for your white box, otherwise you can use a good sturdy tower case. We recommend that you monitor temperatures on you server once it’s up and running to make sure that it’s getting the right ventilation. Just remember that only 3RU or greater cases can give you a full height PCI slot unless you’re using riser boards.

Summary

There are a few situations where you need a server that’s role is not mission critical and does not contain important data. If you choose the white box server solution for your new server you will greatly decrease the cost of your server by sacrificing much of the stability and reliability. It will also give you a fantastic economic opportunity to install some of the newest CPUs alongside truly huge hard drive capacity. You’ll be harnessing the CPU/disk power of 2-3 year old supercomputers for a fraction of the price.

Video Security Monitor

We’ve already looked at the different types of computer video equipment in our previous article on webcam computer surveillance, here is part one of a three part guide to installing a dedicated security camera system using the best tools available on the internet.

Cameras

USB Cameras

zoneminder_1USB cameras are the most prolific cameras available today. These cameras work fine indoors but will over expose as soon as they are pointed outside. USB cameras are also suffer from reliability problems. Tests we conducted showed that the USB camera usually needed to be reset (plugged out and in again) at least once a month. It’s not recommended to use USB cameras except for indoor sporadic monitoring.

You can get simple composite cameras from online stores such as Deal Extreme for as little at AUD $25 delivered to your door.
The benefits of these types of cameras is that they are cheap. Some of these cameras are waterproof which means you can mount them outside and if they break or get stolen it’s no huge loss. 1.3Ghz or 2.4Ghz wireless cameras are not recommended because they are not encrypted and are easily viewable by people nearby using the right equipment. (A potential bonus in a shared driveway situation perhaps?) These cameras will connect to your computer via a capture card.

Composite are great cameras to start with but if you’re wanting to use VMWare to house your zoneminder installation IP cameras are required. VMware server doesn’t support capture cards so IP cameras are your only option. There are USB capture cards available which should work with VMWare and although we haven’t had a chance to test them yet they are rumoured to be unreliable

zoneminder_2composite IR Camera

IP cameras come in three colours, WiFi enabled, Wired only or both. One of the big no-no’s with cameras is sending the signal over wireless. Most people know that wireless is hack-able, so you don’t want to be giving potential burglars a look into you garage. WiFi cameras with microphones even offer the burglars the opportunity to listen in. We recommend using wired cameras as they are not susceptible to WiFi hacking.

Lighting

Cameras pointed indoors still need light, if you’re monitoring a warehouse you’ll need to light the area if you want to see the area. If the area’s dark you have the option of lighting the area or using Infrared.

Many cameras have built in infrared for night viewing. It sounds great but unfortunately the picture quality from infrared is quite poor. These cameras often have Infrared LEDs built into the camera head but these are almost always not bright enough to illuminate the area you need to see.Additional Infrared lights are needed to illuminate the area to get a better picture.

zoneminder_3Motion detection sentry lights

I’m sorry to say, but the best results for night vision are not achieved using Infrared. cheap garden variety motion detecting sentry lights can be configured to throw a 250 watt flood light over the area when they see movement, your cameras can then record a nice bright high quality image. If you want an even better quality image go for a camera such as the Panasonic BL-C1 with colour night vision and a set of sentry lights.

Software

zoneminder_4Zoneminder is a free camera monitoring package that runs on most Linux distributions. It’s considered one of the best camera monitoring solutions out there with all of the features you would expect of a commercial package.

Zoneminder’s only drawback is that there is very little documentation available for it. Having said that if you understand how the web works and know a little about PHP you can make changes to the way that Zoneminder works. If you don’t you can still take advantage of some of the most sophisticated features.

We’ve put together a short list of some of Zoneminder’s more powerful features

  • Fully web based application
    Zoneminder is fully web based, all viewing and configuration can be done from the web browser. This makes remote viewing a snap, simply forward the zoneminder port through your ADSL modem and now you can see your cameras from anywhere.
  • Camera Support
    Zoneminder supports all common cameras available, but Linux might not, you’ll need to make sure that USB cameras and capture cards have driver support in fedora
  • Motion detection
    Zoneminder’s advanced motion detection lets you mark off parts of the image so that they do not trigger motion.
  • Motion capture
    Zoneminder will record events and send them to you as alerts via email or FTP
  • Timestamp
    Not a rocket science but a necessary feature for a security system

Operating System

zoneminder_5CentOS is a community port of the famous RedHat Enterprise Linux used across the globe. We recommend using CentOS or Fedora as it has a wide range of supported hardware which will help you when selecting USB or capture cards for use with your Zoneminder system

We recommend that you install Zoneminder on a Virtual Machine under VMware, ESXi, Hyper-V or KVM. You’ll have to install Zoneminder on your server natively if you plan to use composite cameras and a capture card because current Virtualisation does not support capture cards at this time.

If you’re not familar with Virtualisation, VMWare server allows you to run a copy of another operating system in a window on your desktop. The operating system running in the windows is completely oblivious to the fact it is not running natively on your hardware and will run and act like a normal computer.

Guide to shopping in Sim Lim square

Sim Lim Square is Singapore’s huge IT haven. 6 floors of shops stocking IT equipment from rack servers to digital cameras

Accommodation
When visiting Singapore I stay at the Hotel Intercontinental. It’s a 3 minute walk to through Bugi Junction to SimLim Square.

Getting to Sim Lim Square
Getting a cab to SimLim Square should be reasonably cheap from most hotels.
Make sure you tell the cab driver that you want to go to Sim Lim Square. If you just say Sim Lim they’ll take the opportunity to go to Sim Lim Tower (offices) rather than the shopping centre.
Sim Lim Tower is an electronics haven for Audio and DIY electronics fans and is worth a visit if you own a soldering iron or a nice stereo. We’ll be writing an article about Sim Lim Tower soon.

Shopping in Sim Lim Square
Getting the best deals at Sim Lim Square can be tricky.
The first step to getting a good price is to know that the higher up in the Sim Lim shopping centre the cheaper the goods tend to get. The shops on the ground floors will have higher rental charges and this will be reflected in the prices they sell for. Many tourists tend to get ripped off buying products on these levels.

I recommend reserving two days (or at least two visits) to get to grips with Sim Lim.
Your first visit to Sim Lim should involve going to the top of the building and slowly working your way down from the 7th floor to the ground floor. As you go around ask for a business card and write down any attractive prices that you see on the back of the card from the business. The business cards will have the floor and shop number written on them so you can return later if that’s the best price you can get. As you go around you can ask each shop for their “best price” if they are more expensive you can show them a card from a shop with a cheaper price. They will often drop their prices to compete. You’ll get much better results for this when working without GST and you may need to tell the shop owner this before they’ll drop their prices.

I recommend holding off on any big purchases until you’ve found the best price in all of Sim Lim. Come back on the second day (or second visit) and you’ll be able to go straight to the shops with the best prices. Be careful when picking up any other items not on your list. If you’ve haggled a good price on some equipment the shop will likely try and up sell you on a more profitable model …

Haggling
Haggling doesn’t come easy to westerners and Australians are no different. I’d recommend proposing 5-10% below the price for cash (no GST) and see if the shop keepers propose another price.

Toilets
The toilets on the ground floor are hideous. If you’re not spending a long time in Singapore it might be your only opportunity to see a squat loo.
The toilets on the 3rd floor were once much more accommodating and worlds apart from those on the ground floor, but now they all seem to be horrible.

Claiming GST in Singapore
Singapore has a 7% VAT/GST. Tourists to the country can claim this when they leave the country with goods purchased in Singapore.

Usually you will only be eligible for GST recovery if you purchase more than SG $100 per shop, per day. If you’re hoping to add receipts for products purchased from the same shop in different days forget it. This is why you want to gather all your prices first and pay in one go.

They’re quite strict about the rules for companies and tourists with this, so I wouldn’t bother trying to haggle to get your receipt re-printed or anything.

Usually you’ll need to tell the shop attendant that you need a GST form which is sometimes hand-written but mostly electronically printed.

The printed GST documentation is usually from one of two companies who organise the GST rebates. They both have different rules and forms.

Once you have the forms completed you will have to present the documentation at the airport.

Some shops use a GST counter on the ground floor of Sim Lim Square.

You’ll need your receipt, the gst paperwork from the company you purchased the products from and your passport. You don’t have to have do all this on the same day as you purchased your products.

If you’re lucky you’ll receive cash or a credit card deposit straight away. You’ll usually have to give them a credit-card number anyway. This is so that if you don’t present your paperwork at the airport they can take the cash back from you.

Once you’ve got your completed GST paperwork it’s off to the airport.

Depending on which company is managing your GST rebate you’ll need to visit different booths in different parts of the Airport

If you’ve purchased bulky goods or you’ve packed them in your check in luggage you may need to have them be sighted before you check in your luggage.

They don’t usually ask to see it all, but big ticket items will probably need to be seen. On a recent visit there I bought a watch for my girlfriend, the customs officer looked puzzled as to why I was buying a woman’s watch and wanted to see it.

They often wish to see the original receipt so if it’s not stapled to the GST form you’d better have it near-by

They should give you some paperwork back saying that they’ve sited it. They may also give you a completed envelope to post back to the company providing the GST rebate. When they receive the envelope they will deposit the GST in your bank account

If you’ve been shopping around a bit, you’ll probably have to visit another GST company booth.

Go to the next company GST booth with the paperwork you are carrying. They will probably require you to have your GST form validated which means a trip off to the customs validation booth (it’s usually next-door or not far away)

Once your form is validated return to the company GST booth and give them the completed and validated paperwork. They should hand you cash or you can have the GST deposited into your account.

Magazines
If you’re planning on using the money for magazines for the plane and some food at the airport be careful, The Singapore airport (T1)’s newsagents have some of the worlds worst selection of magazines. I’d recommend buying a magazine before you get to the airport. 😛

Bottom Line
I recommend haggling your prices with shops by saying “no GST”. Most shops will drop their prices significantly if you purchase the product without GST paperwork. This means you can’t claim the 6% GST back at the airport so make sure you’re getting at least a 10-15% discount.

Unless you’ve purchased several hundred dollars worth of gear that you can claim on, I’d recommend not attempting to claim the GST back – The system is difficult to navigate and there’s lots of gotchyas that mean you claim is annulled. The paper work is going to take 5 minutes to complete (usually done in the shop for you) but you’ll spend another 20-30mintes in queues at the airport or shopping centres. If you claim is only for $7 you’re going to waste a fair bit of your holiday…

Using Cacti to measure temperatures

TEMPerThese TEMPer USB Thermometers are cheap and easy to use. Amazon sell them for $24.99 + 2.99 shipping, so they’re great value.

The software included on disk is awful. I mean really really bad. So don’t bother with it. You will however, need the driver on there. The driver software I got was almost entirely in Chinese but once you run it you can see the install button and that’s all you need to click to install the driver.

Once the drivers are successfully installed I suggest unplugging and replugging just to confirm that all is well with the device itself.

The latest UTAC TEMPer software is available on Sourceforge

The UTAC software development was abandoned some time before the end of 2009 but the software is still the best available and contains all the features you’ll probably ever need.

uTAC
Set the UTAC software up to use the XML web server to present an XML page containing the temperatures for the TEMPer sensor(s)

For this setup I don’t enable the HTTP web server option as the XML will give me all I need. If you want to get to the UTAC graph you can keep the web server enabled.

Remember to allow incoming connections to the XML web server in UTAC through your firewall otherwise you wont get any data.
cacti-utac
I also recommend testing the XML server manually by going to http://<your ip address>:5050 and seeing if you get any output.

Some browsers (IE) will not display raw XML so if you get a blank screen that’s actually a good sign. You can usually select to view the source of a web page and you will see the XML there – otherwise use Firefox!
Here’s what the XML should look like if you have two thermometers running:

<utacxmlwebserver>
<actual>
<temp0>22.94</temp0>
<hum0>-99.00</hum0>
<timestamp0>03/07/2010 11:46:05</timestamp0>
<temp1>18.25</temp1>
<hum1>-99.00</hum1>
<timestamp1>03/07/2010 11:46:06</timestamp1>
</actual>
</utacxmlwebserver>

Next you’ll need to create a script file to get the XML page from the UTAC xml webserver and return the result to Cacti

I am running Cacti on Fedora 9 if you’re using a different distribution or version your setup may vary.

I’m not expert in perl so I just knocked up a quick shell script to do this. I’m working on building a super perl script that will do the work without having to save files to disk.

This file should be placed in /usr/share/cacti/scripts/ and I called it temper0.sh

#!/bin/sh
wget -q -O /usr/share/cacti/scripts/temp/temper0.txt http://192.168.2.12:5050
grep temp0 /usr/share/cacti/scripts/temp/temper0.txt > /usr/share/cacti/scripts/temp/temp0.txt
sed -i 's/<temp0>//g' /usr/share/cacti/scripts/temp/temp0.txt
sed -i 's/</temp0>//g' /usr/share/cacti/scripts/temp/temp0.txt
cat /usr/share/cacti/scripts/temp/temp0.txt

To get sed the correct permissions to write to the cacti folder I had to make a temp folder under the cacti scripts folder and use chown to give rights to the cacti user.

You’ll need to make sure the script has execute permissions using chmod +x temper0.sh

Once again it’s best to test your script and make sure it works properly and has the right privileges. A quick way to test is to change to the cacti user (using su cacti) and run the script. If you receive any error messages you’ll need to tweak the permissions on the folder.

Kevin der Kinderen has created a nice guide for going from script to graph in Cacti. I followed his guide substituting my script for his random number generator script.

I have set up two thermometers as part of another project which are working well as you can see from the graphs below
cacti-temp1 cacti-temp2
Because of the cheap price of the units and the fact that the awesome UTAC software will read multiple devices I’m planning on ordering more for my servers too.

If you’re considering getting a few of these TEMPer USB Thermometers please note that they can be unreliable on long run USB cables so you’ll probably need active USB extension cables or powered hubs every few meters.

2015 Update

We have now ported all our thermometer monitoring to Raspberry Pi’s using the i2c interface. We’ll be preparing an article on this soon.